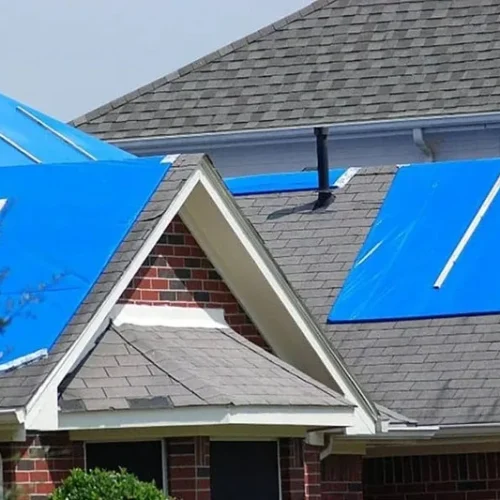

How to Find Emergency Tarping Services in Less Than an Hour
When Every Minute Counts: How to Find Emergency Tarping Fast
Emergency tarping is the fastest way to stop water from destroying your home after storm damage. If you need a quick answer, here it is:
What you need to know right now:
- Call a licensed roofing contractor immediately — look for 24/7 emergency response
- A professional can typically be on-site within 60–90 minutes of your call
- A properly installed tarp protects your home for 30 to 90 days
- Emergency tarping costs $150 to $3,300 nationally, averaging around $450 for a standard home
- Most homeowners insurance policies cover emergency tarping as a required mitigation step
- Do not climb on your roof — assess damage from the ground only
When a storm rolls through Wesley Chapel at 2 a.m. and you wake up to water dripping through your ceiling, you don’t have time to research. You need help fast. Florida’s weather — heavy rain, hurricane-force winds, and intense UV — can turn a small roof breach into a catastrophic interior disaster within 48 hours. Untreated roof openings can allow up to 1 gallon of water per minute per square foot, and mold can begin forming in as little as 24 hours in Florida’s warm, humid climate. Working with emergency roof repair experts who understand Florida’s specific conditions isn’t just smart — it’s the difference between a quick fix and a full interior rebuild.
I’m Tyler Wood, owner of Thunder Bay Roofing in Wesley Chapel, Florida — a veteran-owned roofing company built around fast response and code-compliant work in the Tampa Bay area. Through years of responding to storm damage across West Central Florida, I’ve seen how quickly a delayed emergency tarping decision turns a manageable roof repair into a far more costly restoration project.
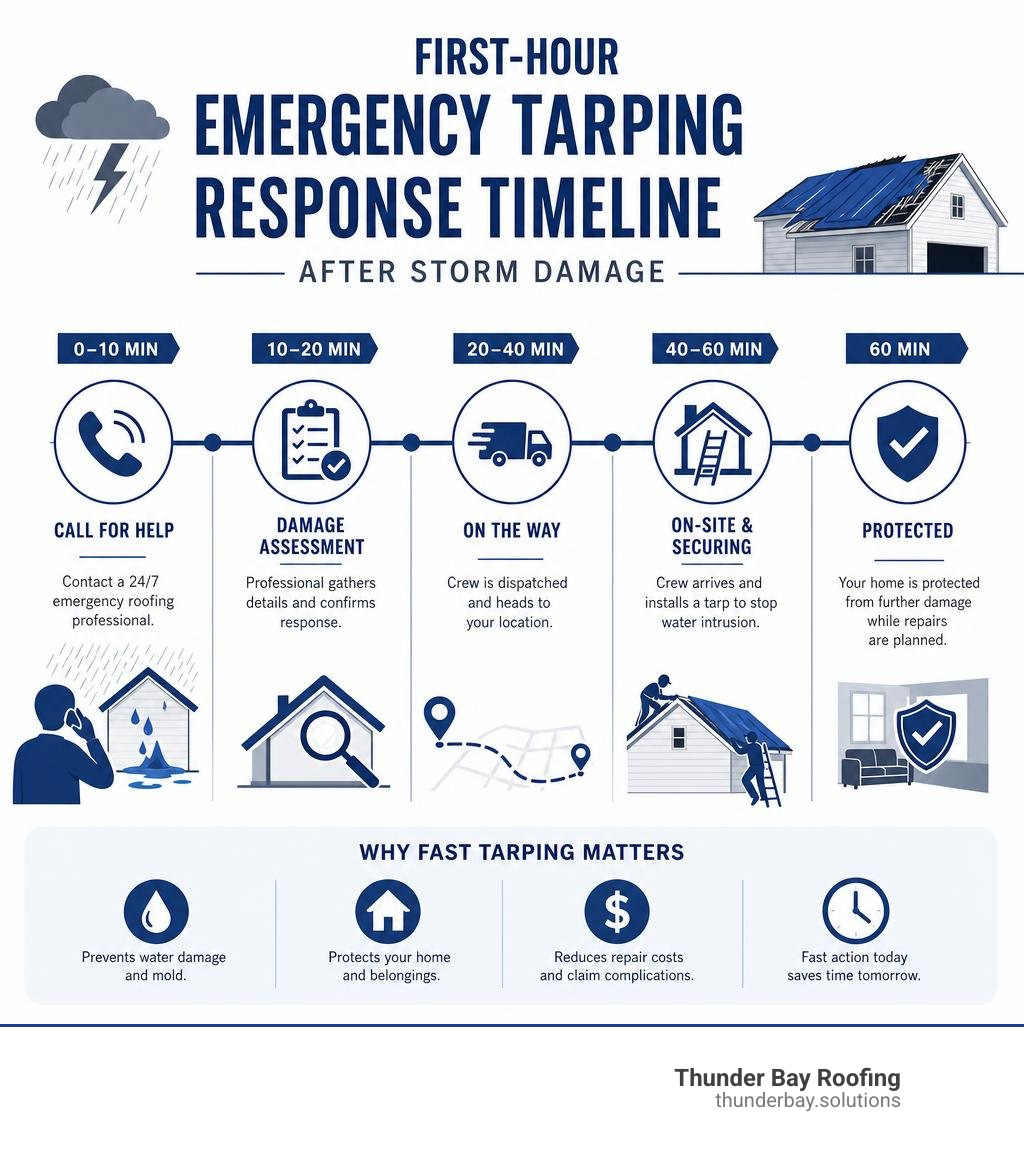
The Critical Role of Emergency Tarping After Storm Damage
When severe weather compromises your roof, the clock starts ticking immediately. Water is a relentless force. During a standard Florida storm event, a compromised roof area with untreated holes can allow up to 1 gallon of water per minute per square foot to pour directly into your home. This water does not just sit in your attic; it travels along rafters, saturates drywall, ruins electrical systems, and can cause ceilings to collapse without warning.
The financial consequences of delaying protection are severe. Industry data shows that the average interior damage from unchecked roof leaks can easily reach $18,000.
Furthermore, the warm, humid climate of West Central Florida creates a perfect breeding ground for organic growth. Mold can begin developing within 24 to 48 hours of moisture exposure in wall cavities, attic insulation, and ceilings.
Securing your home with professional Storm Damaged Roofing mitigation is the single most effective way to halt this destruction. By sealing the breach immediately, you preserve your home’s structural integrity, protect your personal belongings, and save yourself from a massive, stressful interior restoration project.
For homeowners navigating major disasters, understanding the resources provided by the FEMA Disaster Recovery Resources can also provide a helpful safety net during wide-scale community recovery.
When is Immediate Emergency Tarping Required?
Not every roofing issue requires a midnight emergency call, but certain critical scenarios demand immediate emergency tarping to prevent total structural failure:
- Active Interior Leaks: If water is actively dripping into your living space, pooling on ceilings, or running down interior walls, your roof’s waterproof barrier is completely breached.
- Missing Shingles or Tiles: High winds can lift and tear away large sections of shingles or tiles, leaving the sensitive underlayment completely exposed to the elements.
- Tree or Debris Impact: A fallen oak limb or flying storm debris can puncture your roof decking, leaving a physical hole directly into your attic space.
- Fire Damage: After a house fire is extinguished, the structural openings left by the fire or the firefighters must be covered immediately to prevent weather elements from causing secondary structural rot.
Whether you are dealing with the aftermath of a tropical system requiring Hurricane Damage Roof Repair or localized high winds that demand rapid Wind Damage Repair, covering the exposed areas is your primary line of defense.
What to Do in the First Hour After Discovering Roof Damage
The first 60 minutes after discovering a roof breach are crucial for your safety and your future insurance claim. Here is your immediate action plan:
- Prioritize Human Safety: Move your family, pets, and valuable electronics away from the leak path. If you notice a ceiling sagging or bowing from trapped water, do not stand under it; wet drywall can collapse under intense weight.
- Perform a Ground-Level Assessment: Walk around your property and inspect your roof from the safety of the ground. Never climb onto a wet, slippery, or structurally compromised roof during or immediately after a storm.
- Check for Electrical Hazards: If water is leaking near light fixtures, outlets, or your electrical panel, turn off the power to those zones immediately. If there are downed power lines near your home, stay far away and notify your utility company.
- Document Everything: Take at least 25 high-quality, timestamped photos and videos of both the exterior damage (from the ground) and the interior leaks. This visual proof is vital for your insurance adjuster.
- Call a Professional: Contact a licensed, local roofer who offers 24/7 emergency dispatch.
To make sure you do not miss any vital steps during this stressful hour, refer to our comprehensive Blog: The Ultimate Storm Damage Repair Checklist to keep your recovery process organized.
Cost, Insurance Coverage, and the Duty to Mitigate
One of the first questions homeowners ask during a roofing emergency is: “How much is this going to cost me?”
In the United States, emergency roof tarping typically runs from $150 to $3,300, with a standard residential job averaging about $450. In West Central Florida, the cost generally ranges from $300 to $1,500 depending on several specific factors:
- Roof Pitch and Accessibility: Steep-slope roofs require advanced safety rigging and harnesses, which increases labor costs.
- Extent of the Breach: Tarping a small 10×10 foot section of missing shingles is vastly different from covering a massive hole left by a fallen tree.
- Timing: Emergency dispatches in the middle of the night or during active holiday weekends carry an after-hours labor premium.
To get a clear, transparent assessment of your specific situation without any financial surprises, you can easily request a Free Roof Quote from our local team. For additional guidance on managing storm damage costs, you can also consult the Owens Corning Storm Damage Guide.
Does Homeowners Insurance Cover Temporary Roof Protection?
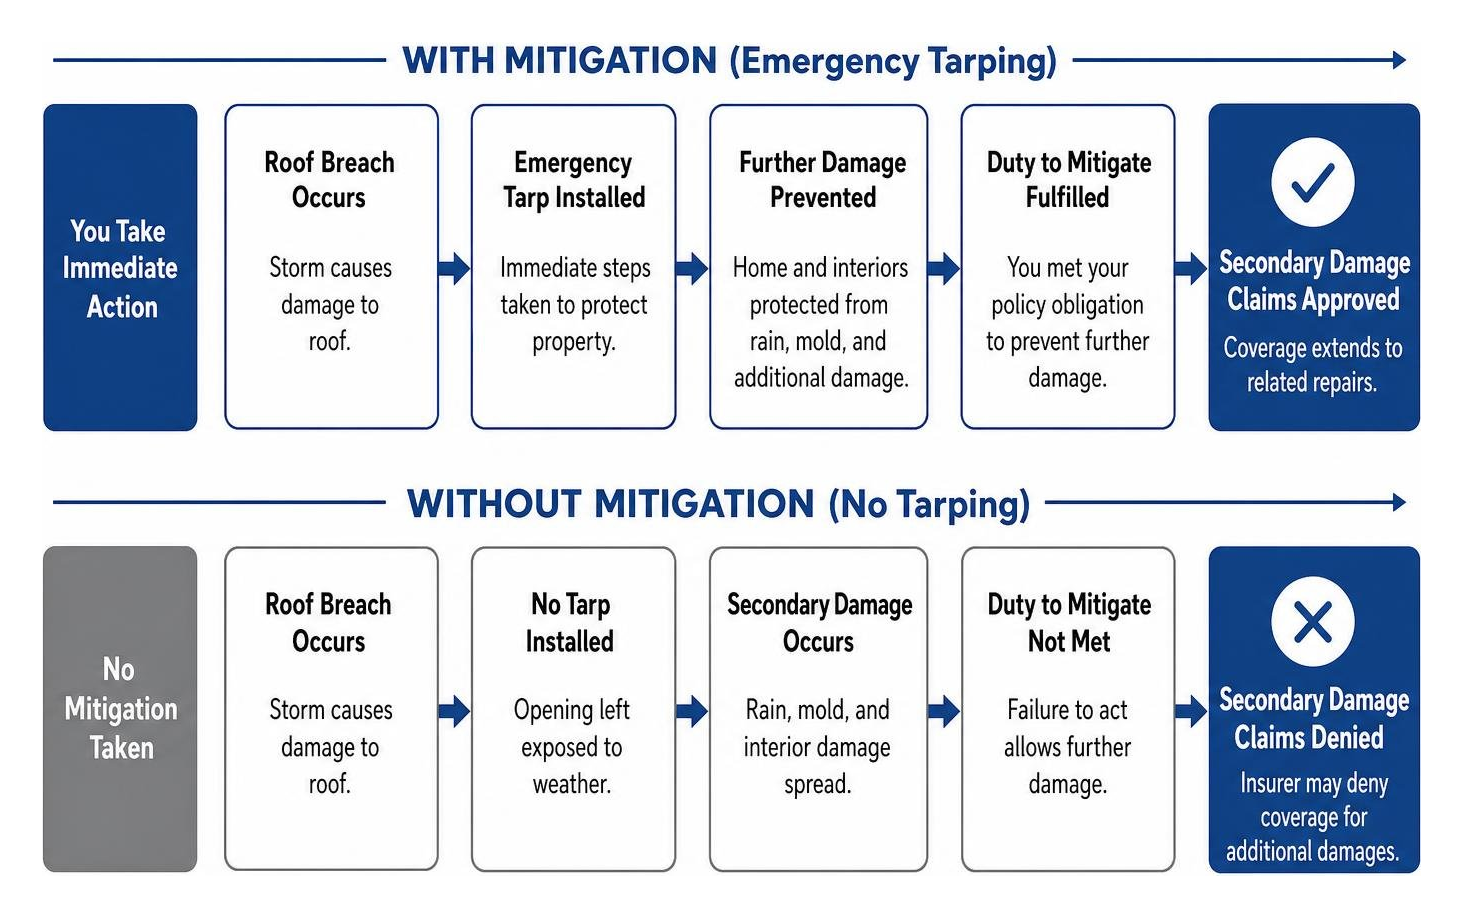
Yes, in almost all cases, your homeowners insurance policy will cover the full cost of emergency roof tarping. In fact, your policy virtually mandates it.
Every standard homeowners insurance policy contains a “Duty to Mitigate” clause. This legal clause requires you, the policyholder, to take immediate, reasonable steps to prevent further damage to your property after an incident. If you leave a roof breach open to the elements and subsequent rainstorms cause extensive interior mold and drywall rot, your insurance carrier has legitimate grounds to deny coverage for those secondary damages.
When we perform an emergency tarp installation, we document the damage with high-resolution photos and provide an invoice coded specifically in Xactimate — the industry-standard billing software used by insurance adjusters — under codes like “WTR TARPNG EMER”. This seamless documentation helps ensure your claim is approved quickly and without friction. For a deeper dive into the insurance side of things, check out our Blog: Everything You Need to Know About Emergency Tarp Services.
Lifespan, Materials, and Technical Specifications
A temporary roof tarp is not a permanent fix, but the quality of the materials used determines how long your home remains safe while you wait for a permanent repair.
Standard consumer-grade tarps sold at local home improvement stores are typically only 3 to 4 mils thick. These thin tarps are highly susceptible to tearing and degrade under Florida’s intense UV rays within 30 days. Professional-grade tarps, however, are made of heavy-duty, UV-resistant woven polyethylene or vinyl that is 10 to 20 mils thick, offering a tear strength of over 300 pounds of force.
A properly installed emergency roof tarp provides effective temporary protection for 30 to 90 days. For homeowners in our local communities, utilizing specialized Lutz, FL Roof Tarping Services ensures that your temporary barrier is engineered to withstand the unique wind and rain patterns of West Central Florida.
| Feature | Standard Emergency Tarping | Shrink Wrap Roofing |
|---|---|---|
| Material Thickness | 10 to 20 mil heavy-duty poly | 12 to 15 mil specialized polymer |
| Installation Method | Screws and wood batten strips | Heat-welded with a propane torch |
| Expected Lifespan | 30 to 90 days | 6 to 12 months |
| Wind Resistance | Up to 85 mph gusts (when pro-installed) | Superior high-wind performance |
| Typical Cost | Lower ($300 – $1,500) | Higher (requires adjuster approval) |
| Best Used For | Rapid response, immediate mitigation | Long-term delays in permanent repairs |
Professional vs. DIY Emergency Tarping: Risks and Success Rates
It can be tempting to grab a ladder, run to the hardware store, and attempt to tarp your roof yourself. However, the data strongly cautions against this.
According to Roofing Contractor Magazine, DIY tarp installations have a 73% failure rate in winds over 50 mph. Improperly anchored tarps fail in 60-70% of severe wind events because they “parachute” — allowing wind to get underneath the loose edges, lifting the tarp and often pulling up more shingles in the process.
Conversely, professional installations that use 2×4 board compression and sufficient overlap achieve a 95%+ success rate in maintaining waterproof integrity.
Beyond the structural risks, the physical danger of DIY roof work is immense. Falls from residential roofs cause thousands of serious injuries every year. Walking on a damaged, wet roof covered in loose granules is incredibly hazardous. If you want to know more about the realities of trying to secure a roof during a storm, read our helpful Blog: How to Seal Your Roof During a Storm Without Getting Soaked.
Step-by-Step Process for Proper Roof Tarp Installation
When our professional crews arrive at your home, we follow a strict, engineered protocol to ensure the tarp remains secure and watertight:
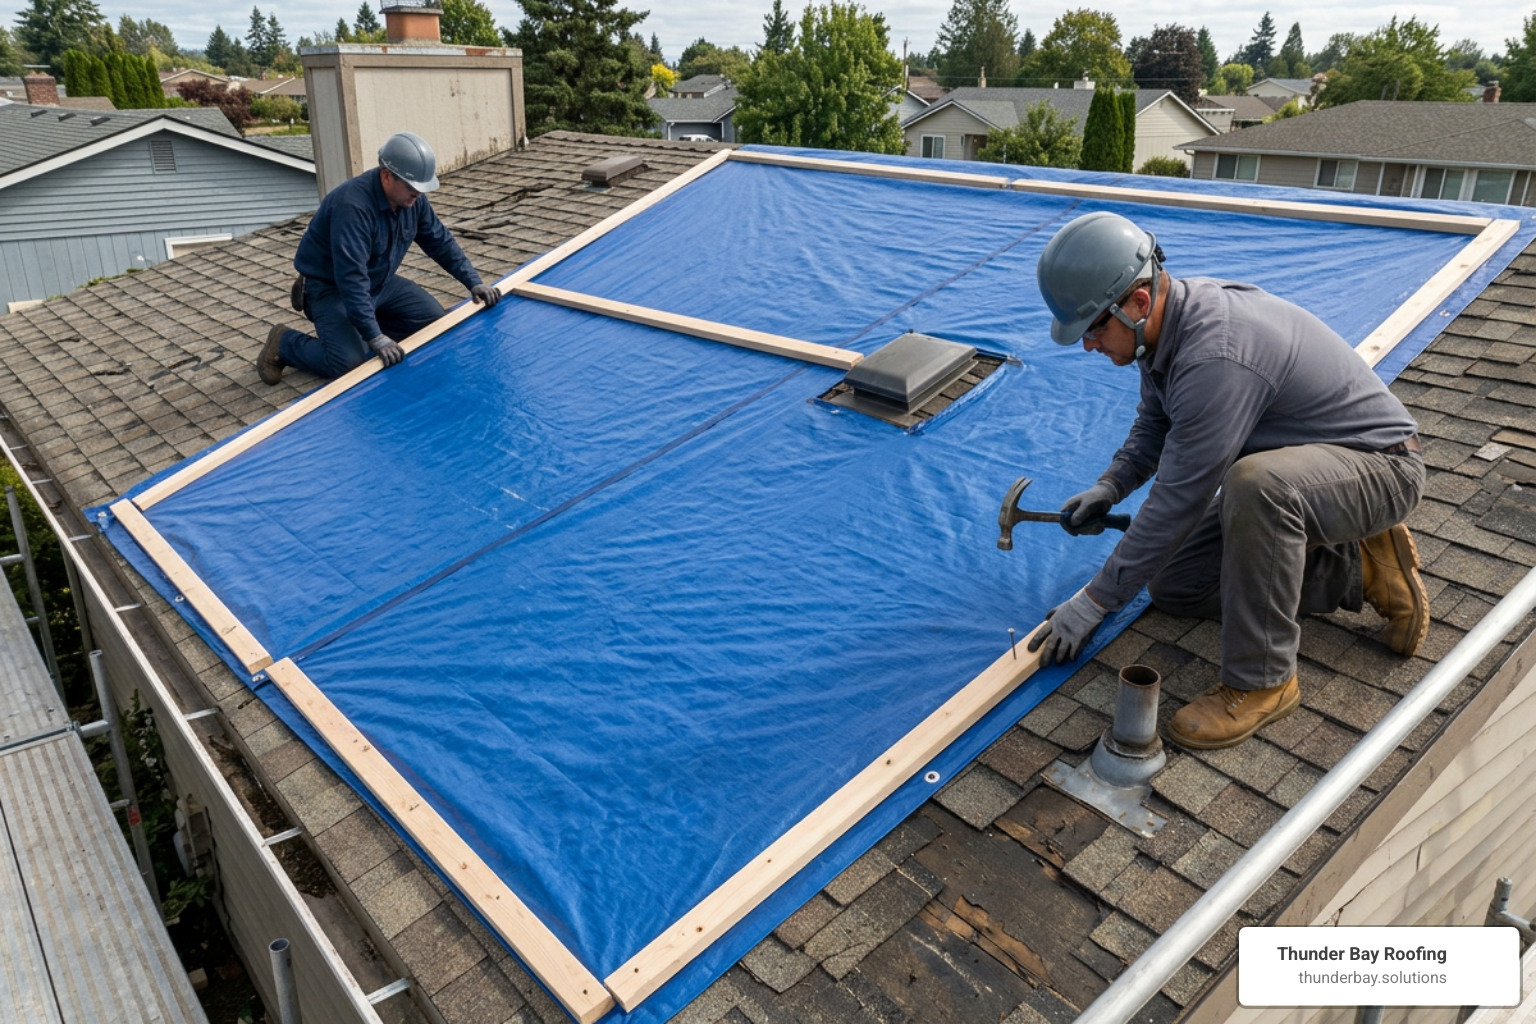
- Damage Assessment and Safety Evaluation: We inspect the roof structure to ensure it is safe to walk on and identify the exact “zonal path” of the water intrusion.
- Debris Removal and Surface Preparation: We clear away fallen branches, loose gravel, and shattered shingles. A clean surface is mandatory to prevent the tarp from tearing or lifting.
- Measuring the Breach: We measure the damaged area and select a tarp that extends at least 4 feet beyond the damage in all directions to prevent water from running under the edges.
- Positioning for Water Shedding: We pull the tarp tight and smooth, wrapping it over the ridge of the roof if the damage is near the peak. This ensures that water sheds downhill naturally over the tarp seams.
- Securing with Perpendicular Anchor Boards: We wrap the edges of the heavy-duty tarp around 2×4 wood batten strips. We then screw these boards directly into the solid roof decking using corrosion-resistant #14 galvanized screws. Running the boards perpendicular to the slope distributes the securing force evenly and prevents water from pooling.
- Final Weatherproofing Inspection: We perform a final check to ensure there are no flapping edges or loose points that could catch the wind.
By using high-quality materials from manufacturers like CertainTeed Roofing Materials, we ensure that even a temporary Roof Repair barrier is built to last.
Frequently Asked Questions about Emergency Roof Protection
How long can a temporary roof tarp safely remain on a roof?
A professionally installed, heavy-duty emergency roof tarp is designed to provide effective protection for 30 to 90 days. While it acts as a reliable shield, it is strictly a temporary solution. Leaving a tarp on your roof for too long can lead to UV degradation, and trapped moisture underneath the tarp can cause secondary wood rot and mold.
It is vital to transition to permanent repairs as quickly as possible. For more information on managing this timeline, read our Blog: Emergency Roof Repair Guide for Leaky Situations.
What is the difference between emergency roof tarping and shrink wrap roofing?
Standard emergency tarping uses heavy-duty plastic tarps secured to the roof with wooden batten strips and screws. It is highly effective, quick to install (taking 1 to 2 hours), and lasts 30 to 90 days.
Shrink wrap roofing involves laying a specialized polymer membrane over the roof and using a heating tool to shrink and seal it tightly to the structure. Shrink wrap can last 6 to 12 months and offers superior wind resistance, but it is significantly more expensive, takes 4 to 8 hours to install, and usually requires prior insurance adjuster approval. Learn more in our Blog: How to Handle Hurricane Roof Repair Like a Pro.
Can I tarp a flat roof with standing water?
Yes, but it requires a specialized process. Before installing a tarp on a flat roof (such as a TPO or EPDM commercial system), our crews must use industrial pumps to clear away any ponding or standing water.
Once the surface is dry and clean, we secure reinforced membranes using weighted sandbags or specialized batten strips rather than driving nails directly into the flat surface, which could cause further leaks. If you suspect a leak on a flat system, scheduling a professional Roof Leak Detection is the best way to pinpoint the issue before tarping.
Conclusion
When severe Florida weather leaves your home exposed, delaying action is the costliest mistake you can make. Water damage spreads quickly, and mold can take hold in your attic in less than 48 hours.
At Thunder Bay Roofing, we provide rapid, professional Emergency Tarping Services across Wesley Chapel, Land O’ Lakes, and Lutz. Our licensed and insured crews have the local expertise and specialized equipment needed to secure your home in less than an hour, protecting your property and keeping your insurance claim on the right track.
Don’t wait for the next storm to cause more damage. Contact Thunder Bay Roofing today for immediate, 24/7 emergency response!