The Ultimate Guide to Roof Leak Repair
Why Roof Leak Repair Can’t Wait
Roof leak repair is one of the most urgent home maintenance tasks you’ll ever face — and the faster you act, the less it costs you. When water breaches your home’s defenses, securing reliable professional Florida roofing services immediately is the best way to prevent catastrophic structural damage.
Here’s a quick overview of what you need to know:
| Situation | What to Do |
|---|---|
| Active leak during rain | Place buckets, move valuables, do NOT go on the roof |
| Leak stopped but stain visible | Inspect attic, trace moisture trail uphill from stain |
| Minor shingle or flashing damage | DIY repair with roofing cement or replacement shingles |
| Sagging ceiling, multiple leaks, or structural damage | Call a licensed roofing professional immediately |
| Storm or hail damage | Document with photos and contact your insurance provider |
Average repair cost: $1,500. Minor repairs run $200–$400. Major repairs can reach $7,000 or more.
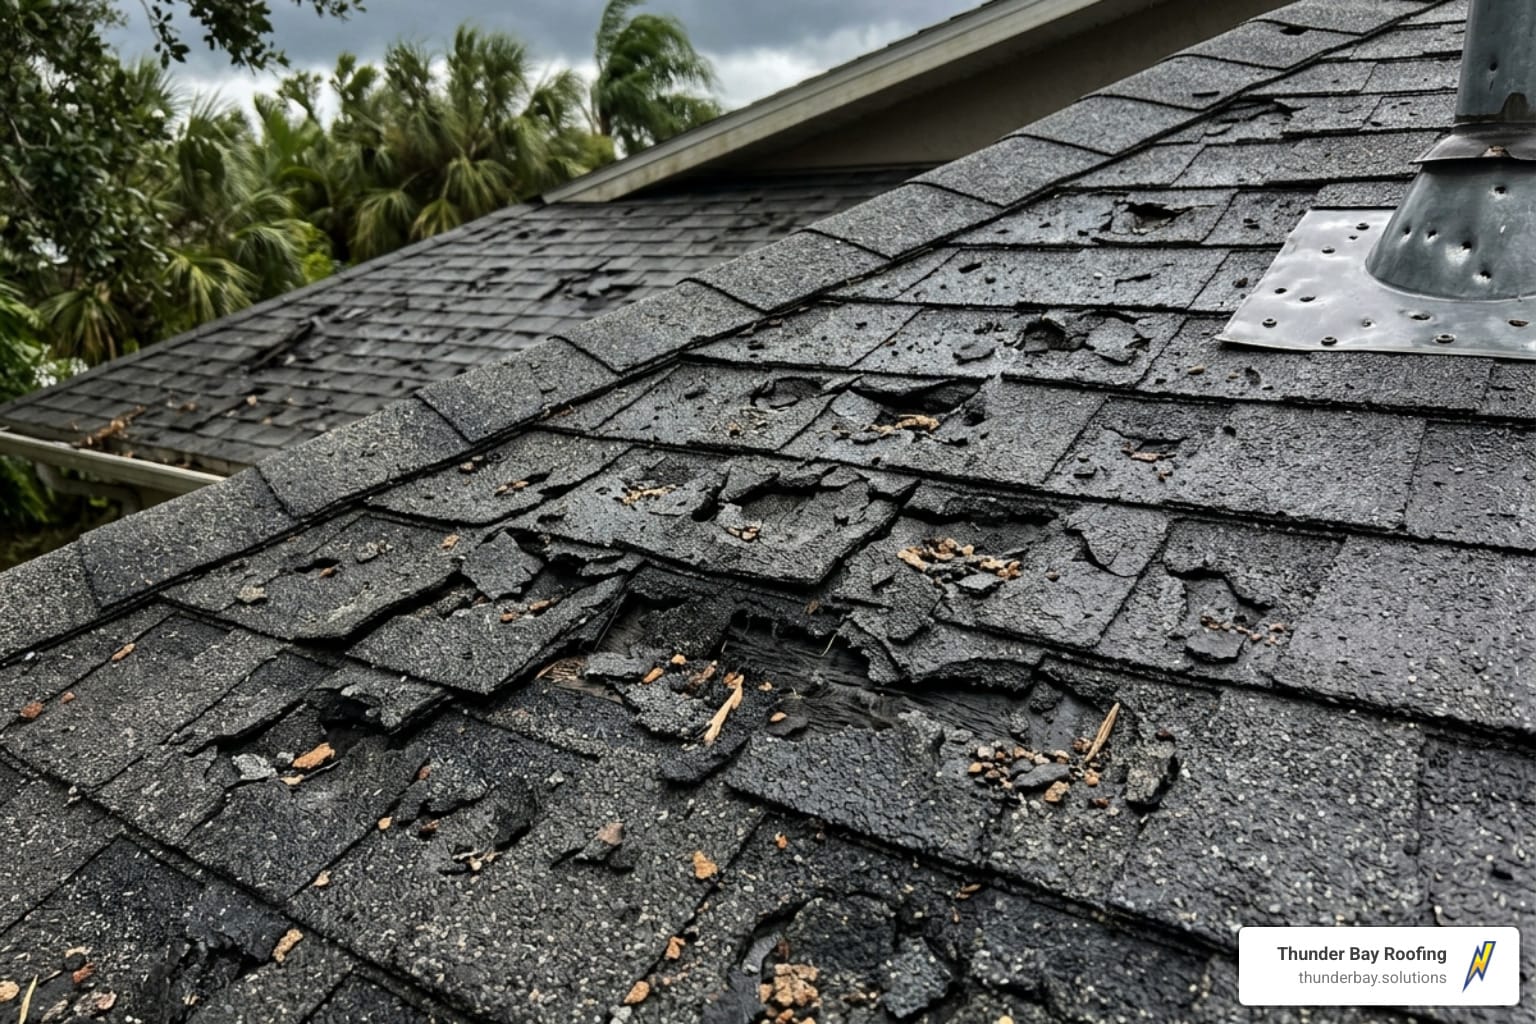
A roof leak rarely stays small. What starts as a damp spot on your ceiling after a hard rain can quietly cause wood rot, mold growth, and insulation damage worth thousands of dollars — often before you ever notice the drip.
Water is the problem. But finding where it enters is almost always harder than fixing it. That’s because water travels along rafters, sheathing, and wiring before it ever drips down — meaning the stain on your ceiling can be 10 to 20 feet away from the actual entry point.
This guide walks you through everything: how to find the leak, how to fix it, when to call a pro, and how to prevent it from happening again. Whether you’re dealing with a failed pipe boot, cracked flashing, or storm damage, you’ll find the answers here.
I’m Tyler Wood, owner of Thunder Bay Roofing in Wesley Chapel, Florida — a licensed, insured, veteran-owned roofing company built for Florida’s extreme weather conditions, including the kind of UV damage, heavy rain, and hurricane-force winds that accelerate roof leak repair needs across the region. With hands-on experience protecting Florida homes since 2025 and a background running a full-service mechanical contracting business since 2019, I’ve seen how fast a small leak becomes a costly disaster.

Roof leak repair terms to know:
Common Causes and How to Identify a Roof Leak

Finding the exact source of water intrusion requires a bit of detective work. Because gravity pulls water downward, moisture will take the path of least resistance. It might enter through a crack near your roof peak, run down a rafter, drip onto your attic insulation, and finally soak through your drywall ceiling several feet away.
To pinpoint the entry point, we utilize systematic Roof Leak Detection methods. Most residential leaks stem from a few common vulnerabilities:
- Failed Pipe Boots: The rubber gaskets around plumbing vent pipes degrade under Florida’s intense UV rays within 10 to 15 years, causing cracks that let water slide straight down the pipe.
- Damaged Flashing: Metal flashing installed around chimneys, dormers, and roof-to-wall intersections can warp, rust, or lose its seal.
- Clogged Gutters: When gutters back up, water pools at the roof’s edge, rotting the fascia boards and seeping under the bottom edge of the shingles.
- Skylight Seals: The rubber seals and flashing kits around skylights dry out and crack over time.
- Storm Damage: High winds and hail can lift, tear, or completely strip away shingles, exposing the underlying deck.
For an exhaustive look at the physical mechanics of water movement through a residential roofing system, you can consult the How to Find and Fix Roof Leaks Guide.
Tracing Water Travel in the Attic
To find a leak from the inside, wait for a dry day or head up during a rainstorm with a high-powered flashlight.
- Locate the interior drip or ceiling stain as your starting reference point.
- Navigate to that exact zone inside your attic. Remember to only step on the wooden ceiling joists, never on the drywall or insulation.
- Shine your flashlight upward along the rafters and the underside of the roof decking.
- Look for moisture trails, dark water stains, or black mold marks on the wood. Water will leave a shiny path when wet, or a dark, discolored trail when dry.
- Trace the trail upward. The point where the moisture trail starts is your actual roof penetration.
- Mark the spot by pushing a small wire or driving a nail up through the hole so you can easily spot it when you get on top of the roof.
The Garden Hose Water Test Method
If a visual attic inspection doesn’t reveal the source, you can simulate a rainstorm using a garden hose. This requires two people: one on the roof with the hose, and one in the attic with a flashlight and a phone to communicate.
- Step 1: Wait for a warm, dry day when the roof is completely dry.
- Step 2: Start at the lowest point of the roof, directly below the suspected leak area.
- Step 3: Spray water onto a small, isolated section just above the gutters. Do not use a pressure washer, as high pressure can force water under perfectly healthy shingles and create artificial leaks.
- Step 4: Hold the hose on that single spot for 5 to 10 minutes while the helper in the attic watches for water entry.
- Step 5: Gradually move the hose upward, isolating one penetration (like a pipe boot, valley, or chimney) at a time. This step-by-step isolation ensures you don’t miss multiple small leaks that might be combining into a single ceiling stain.
Step-by-Step Roof Leak Repair Process
Before attempting any physical repair, check the local weather forecast. Never climb onto a wet roof or attempt repairs during active rain, wind, or lightning storms. Ensure you are wearing rubber-soled, non-slip shoes, safety glasses, and a heavy-duty fall-protection harness secured to a solid anchor point.
If you are dealing with minor shingle damage, you can reference our guide on how to Stop the Drip with These Simple Shingle Repair Tips. For more extensive damage, the following steps outline the standard professional repair process.
Essential Tools and Materials for DIY Roof Leak Repair
Having the correct tools on hand prevents trip-and-fall hazards and ensures a long-lasting patch. For a basic asphalt shingle patch or flashing repair, assemble the following:
- Safety Equipment: Extension ladder, safety harness, and work gloves.
- Hand Tools: Utility knife, flat pry bar (roofer’s bar), hammer, and a caulking gun.
- Fasteners: 1-1/4 inch hot-dipped galvanized roofing nails.
- Sealants: High-quality polyurethane sealant or a premium rubberized wet patch like Henry 208R.
- Reinforcement: Asphalt-saturated helper fabric for a robust 3-course patch.
If you need to purchase materials or rent specialized reach equipment, you can consult The Home Depot’s Roof Repair Guide for product availability.
Executing a Permanent Roof Leak Repair for Shingles
If wind or debris has torn a shingle, you must replace the entire damaged unit to restore the water-shedding barrier.
[Step 1: Break Seal] --> [Step 2: Remove Nails] --> [Step 3: Slide Out Shingle]
 |
 v
[Step 6: Seal Tabs]   <-- [Step 5: Nail New Shingle] <-- [Step 4: Insert New Shingle]
- Break the sealant seal: Slide your flat pry bar carefully under the damaged shingle and the shingle directly above it to release the self-sealing strip.
- Remove the nails: Locate the nails holding the damaged shingle in place (usually four nails per shingle, located just above the exposure line). Place the pry bar under the shingle, lift it slightly to expose the nail head, and pull the nails out with the claw of your bar.
- Slide out the damaged shingle: Pull the broken piece down and away from the roof.
- Inspect the underlayment: Check the exposed asphalt felt or synthetic underlayment for tears or rot. If the wood deck underneath is soft, spongy, or dark, you have structural decay that requires professional replacement.
- Install the new shingle: Slide a matching replacement shingle up into the gap. Ensure it aligns perfectly with the adjacent shingles.
- Nail it down: Drive four new roofing nails into the designated nail line. Avoid nailing into the old holes.
- Seal the tabs: Apply a quarter-sized dab of roofing cement under each shingle tab to secure the wind-resistant bond. If you have completely bare patches, you may need a full Missing Shingle Replacement service to ensure proper alignment.
Repairing Damaged Pipe Boots and Flashing
Because failed pipe boots are the single most common source of residential roof leaks, replacing them is a high-value, low-cost DIY fix.
- Remove the shingles surrounding the pipe boot: Carefully lift and remove the shingles overlapping the top and sides of the boot's metal or plastic flange.
- Pry up the old boot: Remove the nails securing the flange to the roof deck, slide the old boot up and off the PVC plumbing pipe, and discard it.
- Inspect the wood deck: Check the wood around the pipe for rot. If it is solid, clean away any old sealant or dirt from the area.
- Install the new boot: Slide the new rubber-collared pipe boot down over the pipe. Apply a bead of polyurethane sealant to the underside of the flange before pressing it flat against the roof deck.
- Secure with fasteners: Nail the flange down every 4 to 6 inches around the perimeter using galvanized roofing nails.
- Reinstall the shingles: Lay the shingles back over the sides and top of the flange, trimming them to fit snugly around the rubber collar. Seal all exposed nail heads with a dab of premium sealant.
For leaks originating near the chimney, you can find detailed metal-to-masonry repair procedures in our guide on chimney flashing installation and maintenance.
DIY vs. Professional Roof Leak Repair: When to Call a Pro
While patching a single shingle or sealing a pipe boot is highly manageable for a handy homeowner, many roofing situations pose severe safety and structural risks.
If you are dealing with multiple active leaks, a steep roof pitch (greater than a 6:12 slope), or complex valley intersections, attempting a DIY fix can lead to personal injury or further property damage. In these cases, it is always safest to contact a licensed professional. You can read more about evaluating emergency situations in our article, When the Levee Breaks: Finding Fast Emergency Roof Repair in Florida.
Risks of Ignoring a Roof Leak
A small drip might seem like a minor inconvenience, but leaving water intrusion unaddressed can lead to severe structural and financial consequences:
- Mold and Mildew Growth: Mold can establish itself in damp drywall and wood framing within 24 to 48 hours. This poses serious respiratory health risks to your family.
- Wood Rot: Water degrades the structural integrity of your roof rafters, trusses, and plywood decking, eventually leading to a costly Structural Sagging Roof Repair.
- Electrical Fire Hazards: Water dripping onto attic light fixtures, junction boxes, or wall outlets can cause short circuits, sparking electrical fires.
- Ceiling Collapse: Drywall absorbs water like a sponge. Eventually, the weight of the water-logged ceiling will cause it to buckle and collapse into your living space.
Emergency Tarping and Temporary Mitigation
If a major storm damages your roof during active rain, do not attempt to climb onto the roof. Instead, focus on interior damage control and wait for the weather to clear.
- Place buckets or plastic bins under the active drips.
- Puncture a small hole in the center of any bulging drywall ceiling stains using a screwdriver. This allows trapped water to drain cleanly into a bucket rather than spreading horizontally and collapsing the entire ceiling.
- Document everything with photos and videos for your insurance claim.
- Apply an emergency tarp once the storm has fully passed and the roof surface is dry. Use a heavy-duty, UV-resistant blue or silver tarp that extends at least 4 feet beyond the damaged area on all sides. Secure the tarp by wrapping the edges around 2x4 wooden boards and screwing the boards into the roof deck (avoid nailing directly through shingles if possible to prevent extra holes).
For professional emergency assistance, you can schedule our rapid-response Emergency Tarping service to protect your home until permanent repairs can be completed.
Roof Leak Repair Costs and Insurance Coverage in 2026
In 2026, the average cost to professionally repair a roof leak is $1,500, with most homeowners spending between $350 and $1,500 depending on the severity of the damage.
Minor repairs, such as replacing a single pipe boot or patching a few shingles, typically cost between $200 and $400. Moderate repairs involving valley flashing or chimney sealants range from $400 to $1,000. Major repairs that require replacing rotted plywood decking, structural trusses, or large sections of underlayment can run anywhere from $1,000 to $7,000 or more.
The material of your roof also heavily influences both its lifespan and its repair costs:
- Asphalt Shingle Roofs: The most common roof type in Florida. They typically last 15 to 25 years and cost an average of $1,000 (or approximately $90 per square foot) to repair.
- Metal Roofs: Highly durable systems that can last up to 50 years. However, because they require specialized fasteners and panels, repairs average $1,300 (or roughly $400 per square foot).
| Repair Level | Typical Cost Range | Common Examples |
|---|---|---|
| Minor | $200 – $400 | Single pipe boot replacement, nail pop sealing, replacing 1-3 shingles |
| Moderate | $400 – $1,000 | Resealing step flashing, repairing a minor valley leak, chimney cap repair |
| Major | $1,000 – $3,500+ | Replacing rotted roof decking, rebuilding a valley, repairing multiple leaks |
| Full Replacement | $5,000 – $30,000+ | Complete tear-off and installation of a brand-new roofing system |
Does Homeowners Insurance Cover Roof Leak Repairs?
Yes, homeowners insurance typically covers roof leak repairs if the leak was caused by a sudden, accidental event, such as:
- High winds or fallen trees during a major storm.
- Hail damage that punctures or bruises shingles.
- Hurricane-force wind damage.
However, insurance does not cover leaks caused by:
- Gradual wear and tear or aging materials.
- Lack of maintenance (e.g., ignoring clogged gutters or failing to replace worn shingles).
- Improper installation by an unlicensed contractor.
If you suspect storm damage, we recommend having our team perform a professional inspection to document the wind or hail impacts. This documentation is crucial when filing a claim for Storm Damaged Roofing or Hurricane Damage Roof Repair.
How Long Does a Roof Leak Repair Take?
A standard, minor roof leak repair (such as replacing a pipe boot or patching a small shingle patch) can be completed in 2 to 4 hours.
Moderate repairs involving flashing or valleys typically take one full workday. Major structural repairs that involve replacing rotted decking or rebuilding sections of the roof structure can take 1 to 3 days.
That wet weather will delay repairs, and certain sealants (like rubberized wet patches) require up to 30 days of cure time before you can safely apply aluminum coatings or top-coats over them.
Frequently Asked Questions About Roof Leak Repair
Can I fix a roof leak from the inside?
No, you cannot permanently fix a roof leak from inside your attic. While you can apply a temporary bituminous patch or roofing cement to the underside of your roof deck to stop an active drip during a storm, this is only a temporary mitigation step. The water will continue to penetrate the exterior shingles and pool on top of the wood deck, causing hidden rot and structural decay. The actual source of the leak must always be repaired from the outside.
What is the best sealant for roof leaks?
The best sealant depends on the materials you are bonding:
- For shingles and flashing-to-shingle joints: Premium asphalt-based roofing cement or a rubberized wet patch (like Henry 208R) is best.
- For metal-to-masonry or siding joints: A high-quality polyurethane or urethane sealant is superior because it maintains flexibility and resists UV degradation.
- For skylight glass-to-frame seals: Use a 100% silicone sealant, but never use silicone on asphalt shingles or masonry, as it will quickly peel away.
How can I prevent future roof leaks?
The most effective way to prevent roof leaks is to practice consistent, proactive maintenance:
- Clean your gutters at least twice a year (late spring and late fall) to prevent water backup.
- Trim overhanging tree branches at least 6 feet away from your roof to prevent physical damage from falling limbs and wind-driven scraping.
- Schedule professional inspections twice a year and immediately after major storms to catch minor nail pops, cracked boots, or wind damage before they turn into active interior leaks.
Conclusion
A leaking roof can be incredibly stressful, but addressing it quickly protects your home's structural integrity, prevents mold growth, and saves you thousands of dollars in secondary drywall and insulation repairs. Whether you choose to take on a minor DIY patch or hire a professional, the key is to act immediately.
At Thunder Bay Roofing, we provide honest, high-quality roofing services customized for the unique climate challenges of West Central Florida. Whether you are in Wesley Chapel, Land O' Lakes, or Lutz, our licensed and insured team is ready to help with comprehensive roof leak detection, storm damage repair, and complete roof replacements.
If you've noticed water stains, damp attic insulation, or active drips, don't wait for the next heavy rainstorm to cause further damage to your home.
Request a customized Free Roof Quote online to schedule your free, no-obligation roof inspection. For any questions about our localized service area or to book a diagnostic visit, you can reach out directly via our Contact Page or learn more about our premium Roof Repair Services.